티스토리 블로그에 글을 작성하면 깃허브 계정에서 자동으로 잔디가 심어지도록 설정해보도록 하겠습니다. 그러기 위해 Github Action을 이용하여 하루에 한번 티스토리의 RSS를 기반으로 Github에 커밋이 되도록 하겠습니다.
1. 티스토리 RSS 설정
먼저 티스토리 블로그에서 RSS 를 설정해줍니다. 내 블로그 설정 -> 관리 -> 블로그 -> 기타 설정에 위치한 RSS를 "전체 공개"로 설정 후 저장해줍니다. "https://striver.tistory.com/rss" 와 같이 자신의 블로그 주소에 접속하면 RSS 정보가 확인 가능합니다.

2. Repository 생성
Github Action으로 연동할 새로운 repository를 생성합니다.

3. 로컬 환경과 Repository 연동
자신이 편한 위치에 폴더를 하나 만들고 vscode로 들어간 후 해당 폴더를 이전에 만들었던 Repository와 연동해주었습니다.
git init
git branch -M main
git remote add origin https://github.com/ehdtjr/ehdtjr.git
연동이 잘 되었는지는 "git remote -v" 로 확인해 볼 수 있습니다.

4. RSS 및 Git Action 파일 작성
package.json 파일을 생성하기 위해 아래 명령어를 입력합니다.
npm init -y
만약 npm이 설치되지 않았을 경우 "brew install node" 명령어를 선행으로 실행하여 설치해줍니다. (mac os 기준)
이어서 RSS 정보를 파싱할 수 있는 rss-parser 라이브러리를 설치합니다.
npm i rss-parser
생성된 package.json 파일을 열어서 "type": "module", "start": "node index.js",를 추가합니다.
{
  "name": "github_tistory",
  "version": "1.0.0",
  "main": "index.js",
  "type": "module",
  "scripts": {
    "start": "node index.js",
    "test": "echo \"Error: no test specified\" && exit 1"
  },
  "repository": {
    "type": "git",
    "url": "git+https://github.com/ehdtjr/ehdtjr.git"
  },
  "keywords": [],
  "author": "",
  "license": "ISC",
  "bugs": {
    "url": "https://github.com/ehdtjr/ehdtjr/issues"
  },
  "homepage": "https://github.com/ehdtjr/ehdtjr#readme",
  "description": "",
  "dependencies": {
    "rss-parser": "^3.13.0"
  }
}
마지막으로 프로젝트의 root에 index.js 파일을 새롭게 만들고 아래와같이 작성합니다.
import { writeFileSync } from 'node:fs';
import Parser from "rss-parser";

/**
 * README.MD에 작성될 페이지 텍스트
 * @type {string}
 */
let text = `# Hi there 👋

## 이런 환경에 익숙해요✍🏼

## 언어

<p>
  <img alt="" src= "https://img.shields.io/badge/python-3670A0?style=for-the-badge&logo=python&logoColor=ffdd54"/>
</p>

## 📕 Latest Blog Posts

`;

// rss-parser 생성
const parser = new Parser({
    headers: {
        Accept: 'application/rss+xml, application/xml, text/xml; q=0.1',
    }});

(async () => {

    // 피드 목록
    const feed = await parser.parseURL('https://striver.tistory.com/rss'); // 본인의 블로그 주소

    text += `<ul>`;

    // 최신 10개의 글의 제목과 링크를 가져온 후 text에 추가
    for (let i = 0; i < 10; i++) {
        const {title, link} = feed.items[i];
        console.log(`${i + 1}번째 게시물`);
        console.log(`추가될 제목: ${title}`);
        console.log(`추가될 링크: ${link}`);
        text += `<li><a href='${link}' target='_blank'>${title}</a></li>`;
    }

    text += `</ul>`;

    // README.md 파일 생성
    writeFileSync('README.md', text, 'utf8', (e) => {
        console.log(e);
    })
    console.log('업데이트 완료');
})();
5. main.yml 생성
Git action 파일을 생성하기 위해 프로젝트 루트에서 .github\workflows 폴더를 생성하고 해당 폴더 안에 main.yml을 생성합니다.
# This is a basic workflow to help you get started with Actions

name: Readme Update

# Controls when the workflow will run
on:
  push:
    branches: [ main ]
  pull_request:
    branches: [ main ]
  # 1시간에 한번씩 아래 스크립트를 실행한다.
  schedule:
    - cron: "0 */1 * * *"
# A workflow run is made up of one or more jobs that can run sequentially or in parallel
jobs:
  # This workflow contains a single job called "build"
  build:
    runs-on: ubuntu-latest
    steps:
      - uses: actions/checkout@v3
      - uses: actions/setup-node@v3
        with:
          node-version: 20

      - name: Install dependencies
        run: |
          npm ci
          npm install rss-parser

      - name: Update README
        run: npm start

      - name: Check if there are any changes
        id: verify_diff
        run: |
          git diff --quiet . || echo "changed=true" >> $GITHUB_OUTPUT

      - name: Commit README
        if: steps.verify_diff.outputs.changed == 'true'
        run: |
          git config --local user.email "dskang207@gmail.com"
          git config --local user.name "ehdtjr"
          git add .
          git commit -m "Update README.md"
          git push origin main
제일 하단의 run 부분을 자신의 github email, name으로 변경해줘야하고 cron으로 스크립트 실행 주기를 설정할 수 있습니다.
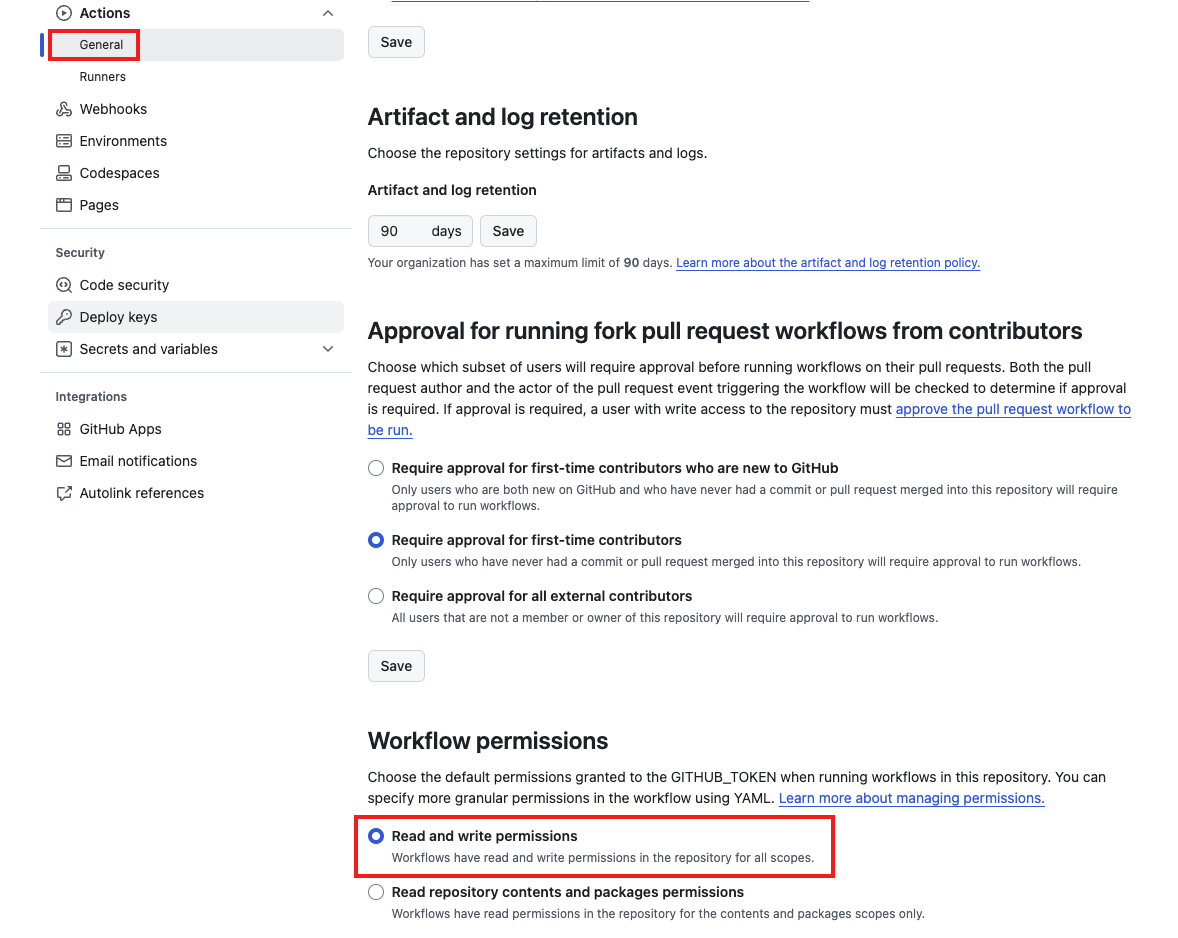
6. Git action permission 설정
Github Action 과정에서 발생할 403 permission 오류를 제어하기 위해 설정을 해줘야합니다. Settings -> Actions -> General에 들어가 하단 설정을 바꾸고 Save를 눌러줍니다.
참고자료
https://peterica.tistory.com/554
https://leejaehoon.tistory.com/entry/Github-Tistory-Github-%EC%97%B0%EB%8F%99%ED%95%98%EA%B8%B0
'Git&GitHub' 카테고리의 다른 글
| [GitHub] Fork & Pull Request (0) | 2025.04.09 |
|---|---|
| [Github] 잔디가 심어지지 않는 문제 해결하기 (0) | 2025.04.03 |
| [Git & GitHub] Branch와 Merge 과정 (2) | 2024.02.26 |
| [Git & GitHub] Git 명령어 (0) | 2023.08.10 |
| [Git & GitHub] Git & GitHub란 무엇인가 (0) | 2023.08.09 |