지난 시간에는 UserService까지 구현해보았습니다. 오늘은 뒷부분을 마저 작성해 보도록 하겠습니다.
회원가입을 위해서 아래와같이 폼 class를 작성했습니다.
package com.example.demo.entity;


import javax.validation.constraints.*;

import lombok.Getter;
import lombok.Setter;

@Getter
@Setter
public class UserCreateForm {

    @Size(min = 3, max = 25)
    @NotEmpty(message = "사용자이름은 필수항목입니다.")
    private String username;

    @NotEmpty(message = "ID는 필수항목입니다.")
    private String userid;

    @NotEmpty(message = "비밀번호는 필수항목입니다.")
    private String password1;

    @NotEmpty(message = "비밀번호 확인은 필수항목입니다.")
    private String password2;

    @NotEmpty(message = "이메일은 필수항목입니다.")
    @Email
    private String email;
}
UserCreateForm 클래스 내부에 내부변수들을 선언하고 검증조건을 설정했습니다. 이 내부변수 값들과 검증조건은 나중에 회원가입 폼에서 입력 될때 사용됩니다 . @Size는 문자열의 길이가 조건 min,max 사이에 해당하는지를 검증하고 @NotEmpty를 통해 값이 null일 경우 message에 값이 주어지도록 했습니다. @Email은 해당 변수의 값이 이메일 형식과 일치하는지를 검증합니다.
Entity, UserService, repository, UserCreateForm이 모두 준비되었으니 컨트롤러와 html 파일을 작성해 보도록 하겠습니다.
package com.example.demo.controller;

import com.example.demo.entity.UserCreateForm;
import com.example.demo.service.UserService;
import org.springframework.security.core.Authentication;
import org.springframework.stereotype.Controller;
import org.springframework.ui.Model;
import org.springframework.dao.DataIntegrityViolationException;
import org.springframework.validation.BindingResult;
import org.springframework.web.bind.annotation.*;

import lombok.RequiredArgsConstructor;

import javax.servlet.http.HttpServletRequest;
import javax.servlet.http.HttpSession;
import javax.validation.Valid;

@RequiredArgsConstructor
@Controller

public class UserController {

    private final UserService userService;

    @GetMapping("/signup")
    public String signup(Model model, UserCreateForm userCreateForm) {
        model.addAttribute("userCreateForm",userCreateForm);
        return "signup_form";
    }

    @PostMapping("/signup")
    public String signup(@Valid UserCreateForm userCreateForm, BindingResult bindingResult,Model model) {
        if (bindingResult.hasErrors()) {
            return "signup_form";
        }

        if (!userCreateForm.getPassword1().equals(userCreateForm.getPassword2())) {
            bindingResult.rejectValue("password2", "passwordInCorrect",
                    "2개의 패스워드가 일치하지 않습니다.");
            return "signup_form";
        }

        try{
            userService.create(userCreateForm.getUsername(),userCreateForm.getUserid(),
                    userCreateForm.getPassword1(),userCreateForm.getEmail());
        }catch (DataIntegrityViolationException e){
            model.addAttribute("message","이미 등록된 사용자입니다.");
            return "signup_form";
        }catch(Exception e) {
            model.addAttribute("message","알 수 없는 오류입니다. 관리자에게 문의하십시오.");
            return "signup_form";
        }
        return "redirect:/";
    }

    }

}
@GetMapping으로 회원가입 페이지가 랜더링 될때 앞에서 작성한 UserCreateForm를 파라미터로 받게되는데 이때 Model도 파라미터도 사용해 줍니다. Controller의 메서드는 Model이라는 타입의 객체를 파라미터로 받을 수 있다. Model 객체는 컨트롤러에서 데이터를 생성해 이를 View에 전달하는 역할을 합니다. (Servelt의 request.setAttribute()과 비슷한 역할) 키, 값 형태로 이루어져 있으며 Model 객체에 값을 담아두면 템플릿에서 그 값을 사용할 수 있습니다. (Model 객체는 따로 생성할 필요없이 컨트롤러 메서드의 매개변수로 지정하기만 하면 스프링부트가 자동으로 Model 객체를 생성) 이 값을 템플릿에서 사용하기 위해서 아래와 같이 타임리프 템플릿 엔진을 사용하였습니다.
<!doctype html>
<html xmlns:th="http://www.thymeleaf.org"
      xmlns:layout="http://www.ultraq.net.nz/thymeleaf/layout"
      layout:decorate="~{layouts/default}">
<head>
  <!-- Required meta tags -->
  <meta charset="utf-8">
  <meta name="viewport" content="width=device-width, initial-scale=1, shrink-to-fit=no">
  <title>회원가입 페이지</title>
  <link rel="stylesheet" media="screen and (max-width:530px)" th:href="@{/css/signup_form_mobile.css}">
  <link rel="stylesheet" media="screen and (min-width:530px)" th:href="@{/css/signup_form.css}">
  <script th:inline="javascript">
    const message=[[${message}]];;
    if (message!=null){
      alert(message);
      window.location.href="/signup"
    }
  </script>
</head>
<body>
  <div class="signup_wrapper">
    <div class="signup_container">
      <div>
        <h2>Sign Up</h2>
      </div>
      <form th:action="@{/signup}" th:object="${userCreateForm}" method="post">
        <div class="input_container">
          <label for="username" class="form-label"></label>
          <input id=username type="text" th:field="*{username}" placeholder="Name">
          <p th:if="${#fields.hasErrors('username')}" th:errors="*{username}" class="fieldError">Incorrect data</p>
        </div>
        <div class="input_container">
          <label for="userid" class="form-label"></label>
          <input id=userid type="text" th:field="*{userid}"placeholder="ID">
          <p th:if="${#fields.hasErrors('userid')}" th:errors="*{userid}" class="fieldError">Incorrect data</p>
        </div>
        <div class="input_container">
          <label for="password1" class="form-label"></label>
          <input id=password1 type="password" th:field="*{password1}"placeholder="Password">
          <p th:if="${#fields.hasErrors('password1')}" th:errors="*{password1}" class="fieldError">Incorrect data</p>
        </div>
        <div class="input_container">
          <label for="password2" class="form-label"></label>
          <input id=password2 type="password" th:field="*{password2}" placeholder="Confirm Password" >
          <p th:if="${#fields.hasErrors('password2')}" th:errors="*{password2}" class="fieldError">Incorrect data</p>
        </div>
        <div class="input_container">
          <label for="email" class="form-label"></label>
          <input id=email type="email" th:field="*{email}" placeholder="E-mail" >
          <p th:if="${#fields.hasErrors('email')}" th:errors="*{email}" class="fieldError">Incorrect data</p>
        </div>
        <div class="sign_up_button">
          <button type="submit">회원가입</button>
        </div>
      </form>
    </div>
</div>
</body>
</html>
"th : " 로 시작하는 속성이 타임리프 부분이며 자바 코드와 연결됩니다. 이 타임리프를 통해 html의 form 태그 안에 작성한 값들이 th:object="${userCreateForm}"을 통해 UserCreateForm에 저장되는 것입니다. input 태그마다 th : field 로 필드 명이 작성 되어있는데 해당 필드명 에러가 있으면 오류 문구를 출력합니다. 예를 들어 사용자 이름에 값을 입력하지 않으면 앞에서 UserCreateForm을 생성할때 작성한 Annotation이 활용되면서 아래와 같이 오류 문구가 나옵니다.

회원가입 창에서 버튼을 눌러서 signup을 Post방식으로 전달하게 되면 @PostMapping("/signup")으로 컨트롤러가 지정되어 회원가입이 진행되도록 하였습니다. 첫번째 if문에서는 bindingResult를 사용해서 검증 오류가 발생 할 경우 다시 회원가입 페이지로 이동하게 됩니다. bindingResult는 검증 오류가 발생할 경우 오류 내용을 보관하는 스프링 프레임워크에서 제공하는 객체로 편리하게 사용 할 수 있습니다. 두번째 if문에서 Password1과 Password2가 일치하지않으면 Password2 필드값에 오류 메세지를 담도록 하였습니다. 마지막으로 unique=true로 설정한 userid나 email 값이 이미 디비에 저장되어있는데 다시 입력할 경우 이미 등록된 사용자이기 때문에 다음과 같은 페이지가 랜더링 됩니다.
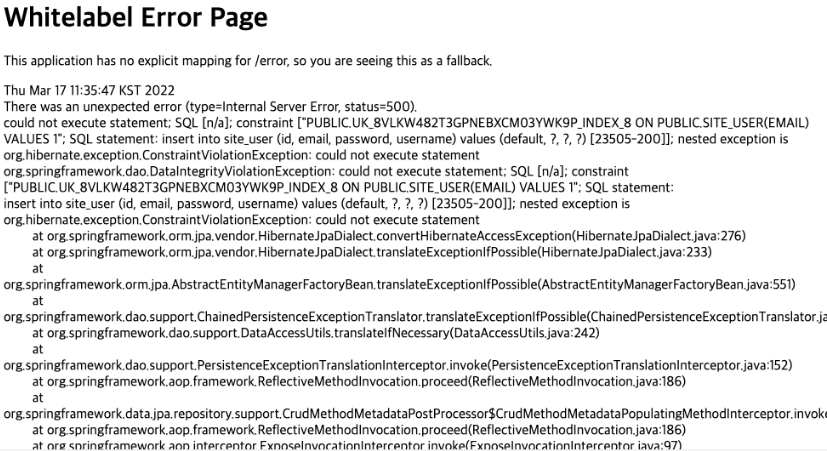
이를 DataIntegrityViolationException e를 이용해서 예외 처리를 해주었습니다. 오류가 발생할 경우 "이미 등록된 사용자입니다."라는 문구를 alert를 사용해서 출력되도록 하였습니다. 여기서 주의할 점은 UX를 고려해 봤을때 뒤로가기를 눌렀는데 방금 나왔던 alert 오류 페이지가 다시 출력 되면은 상당히 불편 할 것입니다. 따라서 alert에서 확인 버튼을 눌렀을때 window.location.href="/signup"를 사용해서 화면이 리다이렉트 되도록 해서 뒤로가기를 눌러도 오류 화면이 나오지 않도록 구현하였습니다. 오류 없이 실행 된다면 회원가입폼에서 입력한 내용이 다음과 같이 DB에 정상적으로 잘 저장 되어있는 모습을 볼 수 있습니다.

회원가입은 여기서 마치고 다음엔 로그인으로 찾아오도록 하겠습니다!
'Spring' 카테고리의 다른 글
| [Spring] 원시 타입(Primitive Type) vs 참조 타입(Reference Type) (0) | 2023.08.08 |
|---|---|
| [Spring] 회원가입(1) (0) | 2023.08.06 |
| [Spring] 개발환경 (0) | 2023.08.05 |


댓글